|
Introduction PCR, or polymerase chain reaction, is a technique often used in the field of molecular genetics to amplify a single section of DNA into many copies. PCR is an essential part of many varieties of DNA lab work, such as genotyping, cloning, mutation detection, sequencing, microarrays, forensics, and paternity testing. In this lab, Allan and I amplified a known region of DNA from the bacteriophage known as λ (Lambda) which is a virus that infects bacterial species. This experiment allowed us to practice and gain a better understanding of the PCR technique in a reliable system, forming a foundation that we can later build on with further exploration of PCR reactions. Materials and Methods For this experiment we worked in pairs, my partner being Allan, and together three pairs shared one gel. The two other pairs we worked with were Nathan and Andrew, and Tejal and Olivia Studebaker. We started this reaction by putting on gloves to protect our reaction from contamination, and then pouring the agarose gel, which was 1% in the buffer TBE. We then decided that Andrew and Nathan were going to prepare the control tube for our gel because only one was needed for the 3 pairs working together. The control tube contained all of the same contents as the PCR reactions with the exception of being cycled through the thermocycler. Next, Allan and I began to prepare our PCR tubes. Every student obtained a tube, and inside was a bead containing the enzyme taq polymerase, nucleotides, and the necessary salts for a successful reaction. We labeled our tubes appropriately and then placed them in the foam holder in ice to keep our tubes cool. After tapping the tubes on the countertop and looking to make sure the bead was at the bottom, 20 microliters of the primer mixture, made of nucleotides, was added to the tube. Then we tapped the tubes on the countertop again to ensure the primer went to the bottom of the tube, and added 10 microliters of lambda DNA, being careful to ensure the DNA solution entered the contents already in the tube as we pipetted the DNA into the tube. We then mixed our solution in the tube and placed them with the rest of the class’ tubes on the ice, while the control tube was placed in a rack, not on ice. Once all the tubes were prepared they were placed in the thermocycler and Dr. Shingleton set it for the right set of denature - anneal - extended cycles. The next class period we ran our gels. We added 4 microliters of UView loading dye/visualization stain to our PCR reaction tube, and Nate and Drew did the same for our gel’s control tube. Because DNA does not naturally glow, the UView stain allows us to see the progress of electrophoresis and is also fluorescent under UV light in order for us to see the bands of the lanes and analyze results. After mixing the solution, and tapping the tube on the countertop to settle the contents, we loaded about 15 microliters of the PCR and loading dye mixture in a different gel lane for each sample (lane 3-8). About 12 microliters of the control were loaded into lane 2 and 15 microliters of the size standard into, given to us by Dr. Shingleton, into lane 1. The gel was done once the UView had moved 45 mm. We ran the gel at 110V starting at 9:46 a.m. and while it was running we boosted the voltage to 120V to eventually get the UView moved 45 mm at 10:16 a.m.. Then we took pictures of the gels to analyze our results.  Thermocycler
Results 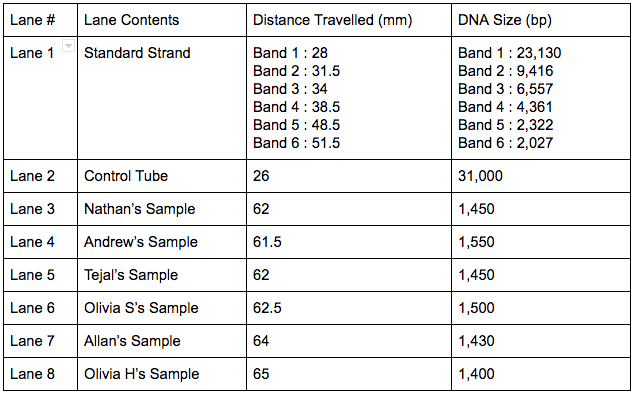 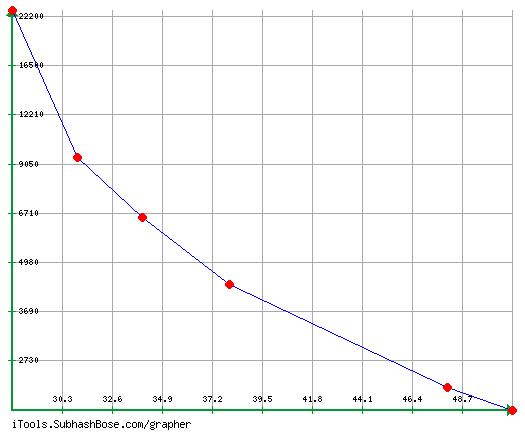 Conclusion PCR is a lab technique used to make many copies of a specific portion of DNA. In order for our class to practice this technique, we used the DNA of the bacteriophage Lambda. My experience with this lab was that it was a helpful learning experience and many useful lab techniques were practiced. I also gained a better understanding of applications of the micropipette, gel electrophoresis, DNA staining, and the thermocycler. Our lab group successfully prepared an agarose gel, each lab member prepared their own PCR tube with the correct contents, and as a group we successfully ran and visualized our gel. Two lab group members also prepared a control tube for our gel, which was ran in lane 2. The control tube was crucial to this experiment because it allowed us to compare the distance travelled between the control tube and our own PCR tube samples. Our control tube travelled 26 mm and our 6 PCR samples ran an average of 62.83 mm, therefore we can conclude that the more base pairs a certain strand of DNA has, the shorter distance it will travel. This relationship demonstrates that as the DNA is copied, more and more base pairs are lost because the copied DNA travelled almost three times as far as the uncopied DNA, or control tube. There were no errors made in the procedure of the lab, however if I were to change something about this lab I would change that the lab spanned over several class periods, which can increase chances of contamination and error. Overall the lab was very successful and our gels and results turned out beautifully, but I was left asking how does a primer solution target a specific section of DNA? What are the contents of the primer and how do you make it? Discussion PCR is the replication of a small segment of DNA. In order to have a successful PCR reaction, the DNA is mixed with the TAQ polymerase and the primer before being put into a thermocycler. The thermocycler is a tool used to raise and lower the temperature of samples, allowing for denaturation and reannealing. For this experiment, the thermocycler began at a high temperature in order to denature the DNA and split the double helix. Then the temperature is lowered so that the primer can bond to the single strands and copy a segment of the DNA. The temperature is raised once again for the TAQ polymerase to bond with the primed DNA and then continue copying the section of DNA. This process is repeated many times to obtain millions of copies of a segment of DNA. Overall, DNA replication in a cell and the process of amplifying DNA using PCR are very similar. One similarity being that a primer is necessary for both processes. However, some key differences are that PCR only copies a portion of the DNA whereas cell DNA replication copies the entire DNA, and that PCR is man manipulated inside a test tube and cell DNA replications occurs naturally inside a cell. Also, during PCR, the double helix is split by heat whereas cells use helicase to split the double helix. And lastly, a cell uses DNA polymerase and in PCR, TAQ polymerase are necessary for a successful reaction. TAQ polymerase, named after the Thermus aquaticus, the bacterium from where it is found, contains the essential enzymes for the PCR reaction. Thermus aquaticus lives in boiling mud pits, which is why it is the ideal organism to derive a polymerase to use in PCR. The fact that the TAQ polymerase enzyme lives at such high temperatures shows that it can survive inside the thermocycler, which is necessary to PCR. An enzyme that lives at room temperature would not survive under the conditions that PCR demands. Another step in the process of PCR is the staining of the DNA. DNA is naturally colorless, therefore in order to gather data and analyze the results, you must stain the DNA so it can be seen under a UV light. We did this by adding the UV Stain to our PCR tube mixtures which allowed us to see the progression of the gel and the bands under the UV light, so we could then visualize our gels and measure the distances travelled. Also, the known size of the amplicon in our experiment is 1,106 base pairs and my closest estimate was 1,400. This error is due to incorrect measuring because of difficulty seeing where exactly each band started, and also because my graph ended so I had to estimate past it, therefore my estimate is slightly off. Overall, from this experiment a better understanding of the different components of PCR, and the lab techniques used in actually carrying out PCR was gained. Bonus 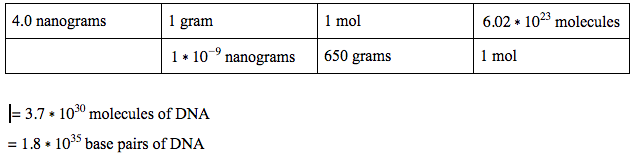 Works Cited “PCR (Polymerase Chain Reaction).” PCR (Polymerase Chain Reaction) | LSR | Bio-Rad, www.bio-rad.com/en-us/applications-technologies/pcr-polymerase-chain-reaction. “Polymerase Chain Reaction.” DNA Learning Center, Youtube, 22 Mar. 2010, www.youtube.com/watch?v=2KoLnIwoZKU.
0 Comments
Introduction The purpose of this lab was to gain important knowledge about tools and techniques commonly used in DNA labs, such as how to use a micropipette and how to carry out electrophoresis, which we performed on the dye of M&M’s. The micropipette is a tool that allows scientist to accurately measure very small amounts of liquids. In this experiment the micropipette allowed us to obtain an accurate amount of extraction solution to dissolve the dye from the candy, and to load a small amount of our samples into the gel wells. The micropipette has been an important development in science because of its wide variety of applications, and how fast, efficient, and accurate it is. Additionally, gel electrophoresis, another technique we practiced in the lab, is used for the separation and analysis of macromolecules based on size, and can also be used to analyze samples of DNA, RNA, and proteins. Gel electrophoresis has many applications in the scientific field, such as getting a DNA fingerprint for forensic purposes, paternity testing, and to look for evolutionary relationships among organisms. Gel electrophoresis also allows scientist to test for genes associated with a particular disease, as well as extract strains of a virus from an organism. Knowing how to properly use a micropipette and understanding the process and applications of gel electrophoresis are key concepts in DNA lab work that will help my lab group and I form a basic foundation of understanding and appreciation for the remainder of the genomics course. Materials and Methods To begin the experiment, my lab group and I watched as Dr. Shingleton poured the agarose gel. While the gel solidified, we then prepared the dye samples from the M&M’s. After labeling our microcentrifuge tubes and three cups, we used the micropipette to obtain extraction solution in each cup and added a single M&M. Each lab group member swirled their cup until the M&M color coating had dissolved, the M&M was then removed and the dye solution was placed in the microcentrifuge tubes with the micropipette. The samples of candy dye were stored in the fridge. The next lab period we centrifuged our samples and then loaded the gel wells with the three samples taken from the candies and the four mixtures (labeled A-D, see well contents below) of standard food dyes Blue 1, Yellow 5, Yellow 6 (orange), and Red 40. We ran the gel from 10:28 a.m. to 10:39 a.m. at 100V, and afterwards the gel was placed onto a light tray to take pictures. Left to right, the wells are # 1-7 (see 5th picture below in slide show)
Results   *The orange and red dyes did not separate clearly, making it difficult to distinguish between the two dyes. Conclusion Looking at the results of our experiment, the dye molecules that traveled the farthest distance through the gel were the yellow bands in wells 4, 5 and 6, all at a distance of 53.75 mm. The blue band in well 2 traveled the shortest distance through the gel with a distance of 26 mm. The amount of time that you run the gel and the size and charge of the molecule can all affect the migration distance. The dye molecules migrated toward the positive end of the gel rig because they were negatively charged. This is because opposites attract, and when we ran the gel, an electric current was turned on so that the negatively charged molecule would move through the gel to the positive end. After analyzing the data, my lab group concluded that the sample in well 1 from the Blue M&M contained the common food dye blue 1. The sample in well 2 from a green M&M may have contained blue 1, but we are unsure if it was possibly a spill from well 1, and it also contained yellow 5. The sample in well 3 from an orange M&M contained either yellow 6 and/or red 40, because of the two dyes’ lack of separation it is hard to tell exactly what the sample contained. For the sample in well 2, is it possible that the blue band was a spill from well 1 because of its smaller distance traveled than the other blue 1 bands, and the lighter color. The mixing of our orange and red bands could be due to not running the gel long enough for them to completely separate, leaving the two bands too close together to distinguish apart. Discussion In gel electrophoresis, agarose is frequently used to form the gel. Agarose is a purified form of agar, generally extracted from certain red seaweed or algae. Powdered agarose is added to liquid buffer and then boiled until agarose dissolves, then is is cooled and poured into a casting tray. A comb is placed in the casting tray to create a row of wells for the samples. Once the comb is removed from the solidified gel, it is ready to be loaded and ran. Agarose gel is effective for electrophoresis because it is essentially like a filter. It has minuscule pores that allow smaller molecules to migrate through the pores of the gel quicker than larger molecules, thus causing the molecules to be separated partly because of their difference in size. Therefore a DNA molecule with a molecular weight of 600 daltons, a measurement of molecular weight and equivalent to the atomic mass unit, would travel farther than a DNA molecule with a molecular weight of 5000 daltons because of the difference in difficulty for the molecule to move through the gel. The charge of a molecule also influences how a molecule moves through the agarose gel during electrophoresis. There is a positive end that the negatively charged molecules migrate toward. This is because of an electric current helping move the molecules through the gel. Therefore, not all dyes can be used for this lab experiment. For example, Carminic Acid, Betanin, and Citrus Red 2 are all dyes that could not have been used in this lab because of their lack of charge. Without a charge their would be no attraction to the positive end and no separation of the molecules. However, Fast Green FCF molecule could be used in this lab because of the presence of a negative charge. There are many components of gel electrophoresis, but from this lab many things were learned, such as how to use a micropipette, how to do gel electrophoresis, why it works, why it is important, and how it can be used in the science world. These topics covered in this lab are essential to the modern science world because they are the building blocks of so many different fields of science, such as forensic science, molecular biology, genetics, and many more. Works Cited
“Gel Electrophoresis.” Science Learning Hub, 20 Nov. 2007, www.sciencelearn.org.nz/ resources/2029-gel-electrophoresis. “Introductory Gel Electrophoresis.” Carolina Biological Supply Company, 2005. Song, Guo Guo-qing, and David Douches. “Agarose Gel Electrophoresis.” 2009. |


